$dynamicTableOfContent
About Printing Address Labels from Excel
This quick guide and video will show you how to print address labels from Excel, in less than 5 minutes.
It’s quick and easy to print address labels in excel yourself!
Step 1 : Choose Your Address Mailing Labels
There are lots of different types of Address Labels to choose from. Label options differ in color, size and shape.
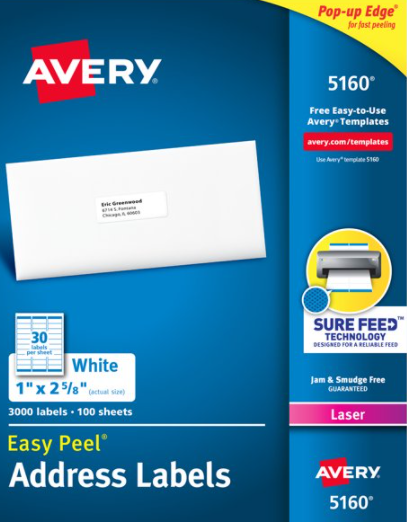
If you’re looking for standard, white, peel & stick Address Labels (which look great on Postcards & Envelopes), we recommend using Avery 5160 Labels.
You can purchase Avery 5160 Address Labels online at Amazon or Walmart (to name a few) , or in your local stationary store.
 |  |
Step 2 : Setup Your Address List in Microsoft Excel
Once you’ve chosen your mailing address labels, the next step is to create address block labels in an Excel spreadsheet.
Select your Address List
You can create your own mailing address list, using the Names & Addresses from your current Contacts/Customers.
Or, if you don’t want to use your own mailing list (or you don’t have one), you can purchase a list of Names & Addresses from a reputable data source.
If you want to grow your business and send an advertisement to prospective new customers, you can Buy a Mailing List online in an Excel worksheet format and then use that list to create mailing Labels from excel.
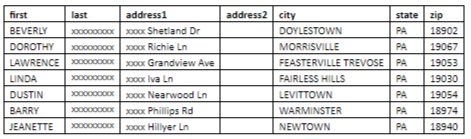
Regardless of if you purchase a mailing list, or if you create your own, your Mailing Address List in Excel must include correct Headers. So, before you print labels from excel, you must double-check your column Headers and make sure they are all setup correctly.
Setup Correct Column Headers
When you open your Excel data file List, the Headers are located in the first row. The excel sheet Headers are sometimes referred to as ‘column headings’ and they describe the contents of each column in your excel file spreadsheet.
You need to make sure that there is a designated Column and Header for each item that you want displayed on your Labels.
If the excel spreadsheet doesn’t have separated fields, you’ll need to adjust this before moving forward.
Here are the most common items that are included on address labels from excel:
- Title (Mr, Mrs, Doctor etc)
- First Name
- Last Name
- Street Address
- City
- State
- Zip code
Step 3 : Organize Your Address Labels in Microsoft Word
Now that you’ve got your mailing address list ready, the next step is to organize your Labels in Microsoft Word.
You can use a paid version of Microsoft Word, or download a simple free version called Microsoft 365 .
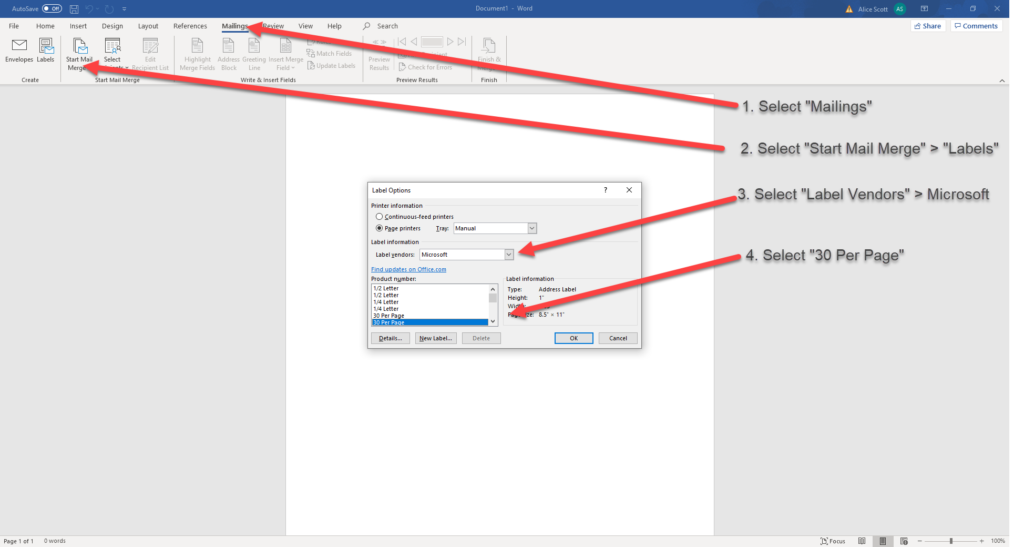
Open a new , blank Word starting document, click ok, then follow these steps:
- Select ‘Mailings’ from the top navigation menu.
- Select ‘Start Mail Merge’ > ‘Labels’
- Select ‘Label Vendors’ from the dialog box > ‘Microsoft’
- Select ’30 Per Page’
- Click ‘Ok’
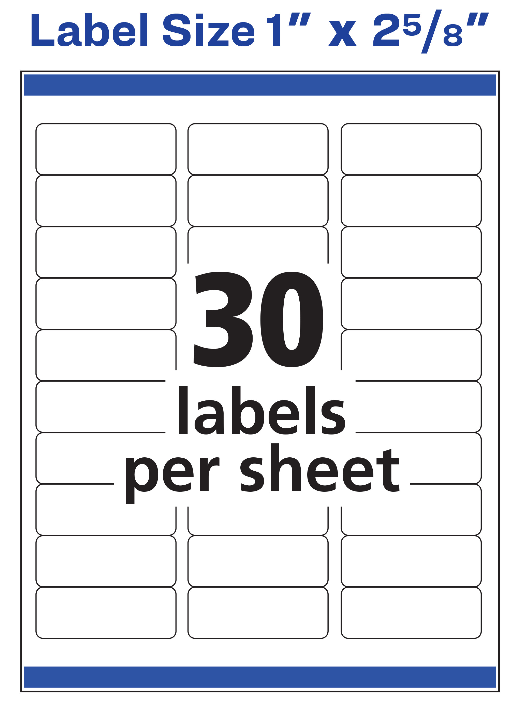
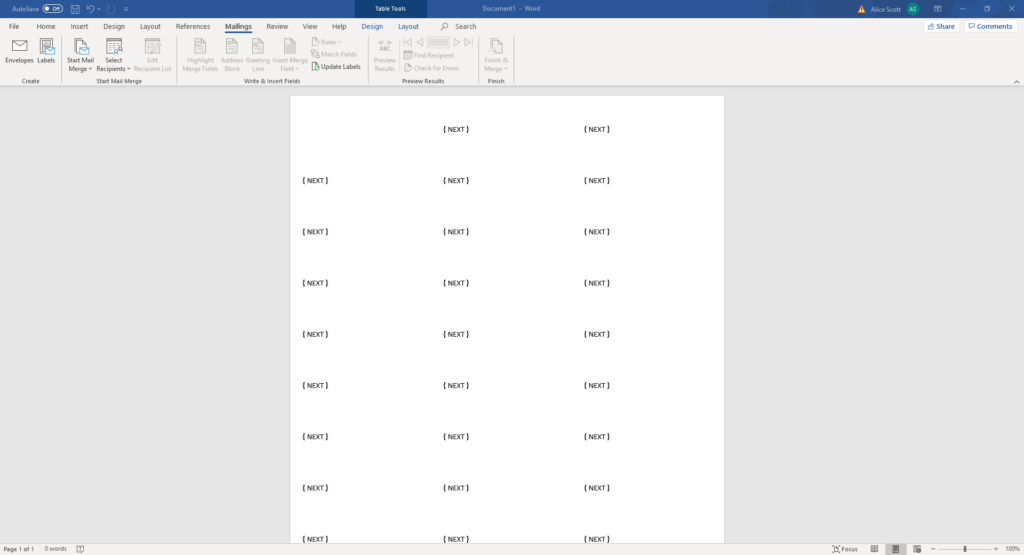
After you click Ok you will see the first sheet of your blank Labels setup on the screen. It will look like this:
Step 4 : Perform a Mail Merge
Now that you’ve organized your Labels in Word, the next step is to setup and perform the mail merge. In this step, we will connect your List in Excel to your Labels in Word.
To start your Mail Merge you’ll use the mail merge feature or the step-by-step mail merge wizard and follow these steps:
- Select ‘Select Recipients’ then > ‘Use an Existing List’
- Find the mailing address List that you want to use, then > ‘Open’
- Select ‘Edit Recipient List’
- Click ‘Ok’
Selecting ‘Edit Recipient List’ is optional. But we recommend doing it, because it’s a quick way for you to make sure that the correct List is now linked to your Labels.

Insert Merge Fields
The next step is to tell Word which Fields/Headers you’d like to use from your List.
- Place your cursor in the top left hand corner of the first Label, then Select ‘Insert Merge Field’
- Select ‘First Name’, then use your space bar to add a space
- Select ‘Last Name’, then hit Enter to move to the next line of your Label
- Select ‘Address’, then hit Enter again, to move down to the next line
- Select ‘City’, then a add a comma
- Select ‘State’ then another comma
- Select ‘Zip Code’
Update Labels
Once you’ve setup your first, new Label, then select ‘Update Labels’. This will select labels and update all your other Labels so that they match fields and the same format as your first Label.
Finish & Merge
The last step of the mail merge is to select ‘Finish & Merge’.
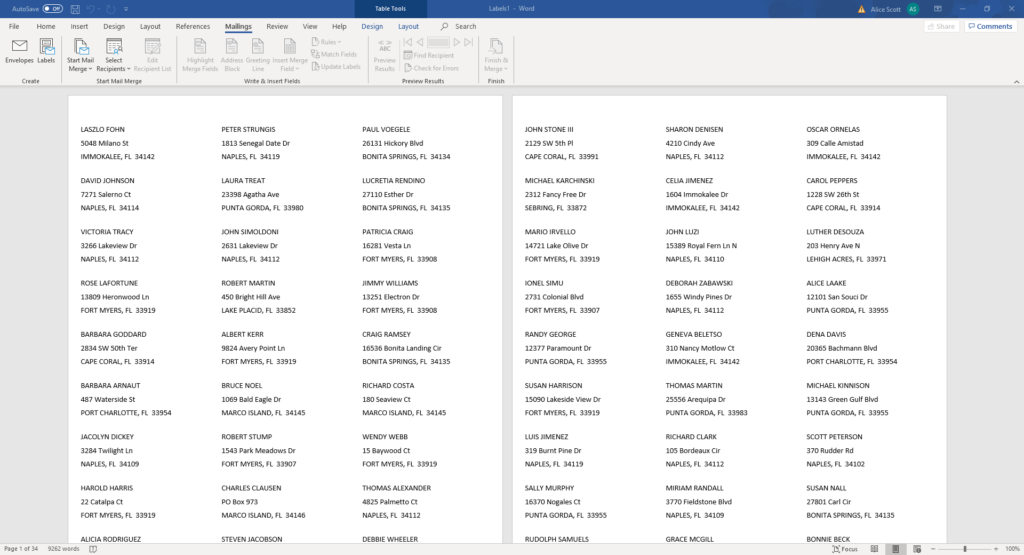
This last step will merge to new document and link your mailing address List with all your Labels.
After you select ‘Finish & Merge’, Word will open a new document, and you will see all your newly merged Labels! Every label will include your recipient information, with Names and Street Addresses, Cities and Zip Codes.
This is a good time to save your new Labels document. Go to File > Save As , and then save the file to your desktop/mac. This can be used in the future as a label template that you can re-use whenever you need to print Labels.
Step 5 : Print Your Address Labels from Excel!
Now that you’ve done your mail merge and your Labels are setup correctly, the final step is to print them.
We suggest that you preview results first, and then printing just one page of Labels to start. This way you can make sure that the Labels are printing properly before you print all the other Labels.
After you print one page of Labels, and they look perfect (Hooray!) you can print the whole document and all your Labels.
We hope you found this tutorial helpful! If for any reason you decide that you don’t want to print mailing labels yourself, or you’re having trouble printing them, please give us a call.
We can make Labels for you, and we’ll ship them to you!
Other Helpful Resources
- Labels
- Avery 5160 Template
- Business Email Lists
- Buy Email Lists & Email Address Lists
- How to Print Address Labels from a PDF file
- USPS Address Lookup
Testimonials
How To Print Address Labels From Excel FAQs
[Q]Will “Or Current Resident” fit on to the Avery 5160 (30 on a sheet) address labels?[A]Yes it will.
[Q]Is it easy to edit individual documents?[A]Yes it is easy to edit labels and individual documents. Just place your cursor on the label that you’d like to edit, and make the necessary changes.
[Q]Do you provide a crib sheet for printing mailing address labels from excel?[A]Yes we do. When we format the list for you and email you the PDF we also email you a ‘how to’ document. If you get stuck, you can always call our Customer Service folks who will help you: 1 866 306 8674.
[Q]How do you ship the printed labels if I decide to get you to print and ship them to me?[A]We ship printed labels by USPS Priority Mail and this takes 2-4 days to get to you.
[Q]Can I use Microsoft Office to print Labels?[A] Yes! Microsoft Office is an older software program that includes Word and other office related programs.
[Q]Can I use the mail merge wizard?[A]Yes! If you see the word mail merge ‘wizard’ option, feel free to give it a try and follow the prompts.